Pre-war buildings are the backbone of the New York City skyline. Built primarily between the 1880s and 1940, they include brownstones, tenement buildings, loft buildings, and many of the mid-rise apartment and commercial structures that line streets across all five boroughs.
These buildings were constructed with materials and techniques that were state-of-the-art for their era. But 80 to 140 years of exposure to New York weather, pollution, and vibration have taken a toll. And the parapets, sitting exposed at the very top of these structures, bear the worst of it.
If you own or manage a pre-war building in NYC, understanding the specific parapet problems that affect your building type is not optional. It is the difference between catching a $5,000 repair early and facing a $50,000 emergency with a sidewalk shed blocking your building entrance.
This guide covers the most common parapet issues in pre-war construction, why they happen, and what to look for between professional inspections. For a detailed overview of NYC's annual inspection requirements, see the complete guide to Local Law 126.
What Makes Pre-War Parapets Different
Not all parapets are created equal. The materials, construction methods, and design choices used in pre-war NYC buildings create a specific set of vulnerabilities that newer buildings simply do not have.
The Materials
Soft Brick
Clay bricks fired at lower temperatures, more porous and absorbent than modern bricks. Water absorption is the starting point for most deterioration.
Lime-Based Mortar
Softer than brick by design, allowing walls to flex with temperature changes. But it erodes faster than Portland cement mortar, especially under freeze-thaw cycles.
Natural Stone
Brownstone, limestone, or granite copings and cornices. Brownstone spalls and delaminates. Limestone dissolves in acidic rain. Granite cracks at joints.
Terra Cotta
Fired clay used for ornamental elements. When the outer glaze cracks, water infiltrates the porous interior, causing expansion and structural failure.
Cast & Wrought Iron
Railings, brackets, and embedded anchors. When iron rusts, it expands to several times its original volume, cracking surrounding masonry from within.
The Construction Methods
Pre-war parapets were typically built as extensions of the building's load-bearing exterior walls. The parapet is the same multi-wythe brick wall that continues from the foundation to the roof, just extending a few feet above the roofline. This means moisture damage in the parapet can migrate down into the wall below.
Missing Modern Features
- No through-wall flashing at the parapet base
- No cap flashing or sheet metal at the top
- No weep holes to drain trapped moisture
- No control joints for thermal expansion
- Minimal or no waterproofing on any surface
These missing elements mean pre-war parapets have been absorbing and retaining water for their entire existence. That is the root cause of most problems you will find.
The 10 Most Common Parapet Problems in Pre-War Buildings
1. Mortar Joint Deterioration
What it looks like
Recessed, crumbling, or missing mortar between bricks. In advanced cases, you can push a key or screwdriver into the joint with almost no resistance. The joints may look like dark, empty grooves.
Why it happens
Lime mortar was designed to be sacrificial -- it was meant to erode before the brick did. After 80 to 100+ years of rain, wind, freeze-thaw cycles, and pollution, the original mortar has often eroded well beyond its functional limit.
What to do
Repointing with a lime-based or lime-dominant mortar mix compatible with the soft original brick. Using Portland cement mortar on soft brick is a common mistake that causes more damage -- the hard mortar traps moisture and transfers stress to the softer brick.
2. Brick Spalling
What it looks like
The face of the brick flakes, chips, or breaks off in layers. Affected bricks may look like they are peeling or shedding their outer surface.
Why it happens
Water enters a porous brick and freezes, expanding by approximately 9 percent. This expansion pushes the outer face outward. After hundreds of freeze-thaw cycles, the face separates and falls off. Accelerated by incorrect repointing with Portland cement mortar or waterproof sealers.
What to do
Moderately spalled bricks can sometimes be turned around or patched. Severely spalled bricks need to be cut out and replaced with matching salvaged brick. The underlying moisture source must also be addressed.
3. Coping Stone Failure
What it looks like
Coping stones cracked, shifted out of alignment, missing mortar at joints, or loose enough to rock when touched. In some cases, sections have fallen off entirely.
Why it matters
A loose coping stone sitting on top of a parapet wall several stories above a sidewalk is one of the highest-risk conditions. A coping can weigh 30 to 80 pounds or more. This is one of the conditions most likely to trigger an Unsafe classification.
What to do
Repoint coping joints with flexible, weather-resistant mortar. If copings are cracked or severely deteriorated, replace them. If iron anchors are rusting, they need to be cut out and replaced with stainless steel before the coping is reset.
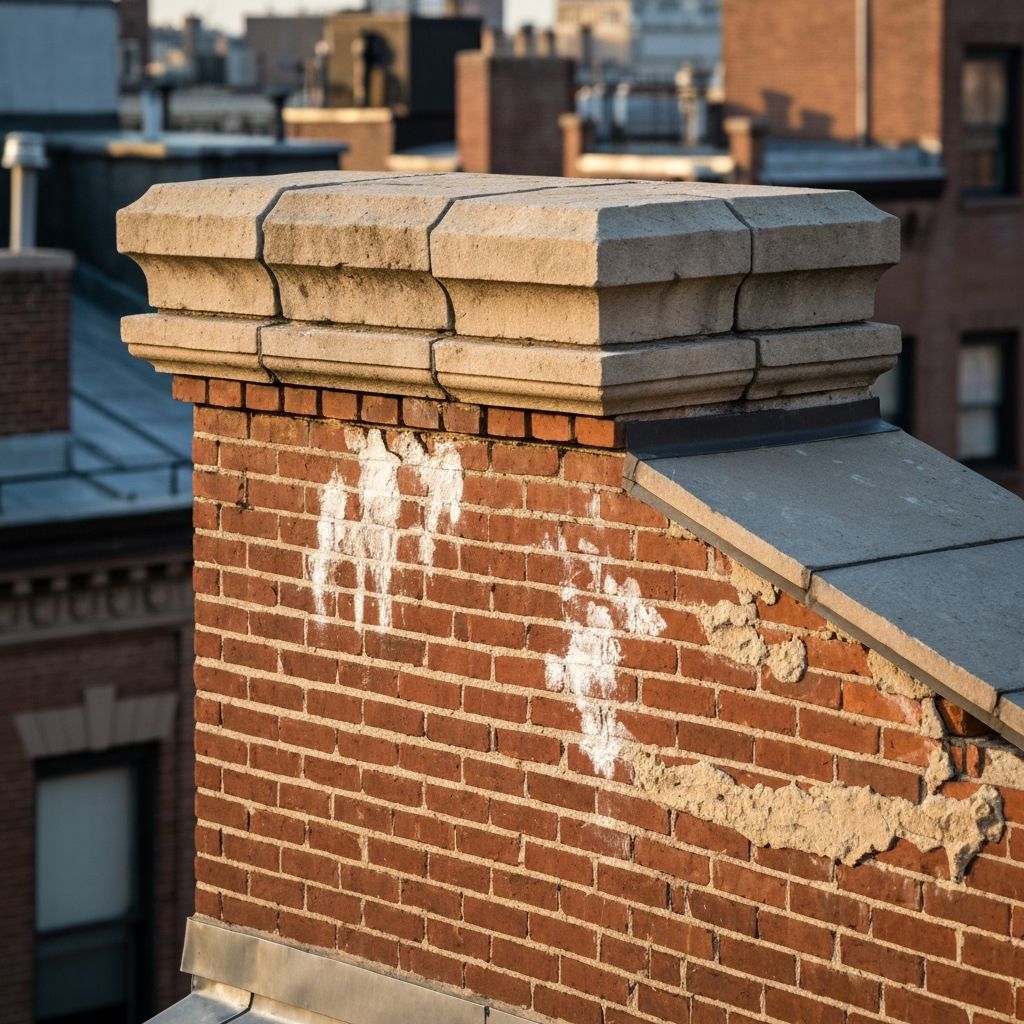
4. Efflorescence and Salt Deposits
What it looks like
White, chalky, or crystalline deposits on the surface of the brick or mortar. Sometimes powdery, sometimes hard and crusty.
Why it matters
Efflorescence is a symptom, not a disease. It is a reliable indicator that water is moving through the wall. When you see white deposits, the question is not "how do I clean this off" but "where is the water getting in."
What to do
Clean with a stiff brush and water (no acid on lime mortar or soft brick). Then investigate and address the water entry point: failed coping joints, missing flashing, deteriorated mortar, or roof drainage issues.
5. Leaning or Bowing
What it looks like
The parapet wall is no longer plumb. It may lean outward toward the street, inward toward the roof, or bulge outward at a specific section.
A leaning parapet is a structural failure in progress. If the lean exceeds approximately 1 inch per foot of height, the parapet is at risk of partial or complete collapse. Almost always classified as Unsafe.
What to do
Leaning parapets typically require partial or full rebuilding. The compromised section must be taken down to a stable course and rebuilt plumb, with proper ties back to the building structure. This requires a qualified masonry contractor and engineering oversight.
6. Water Infiltration at the Parapet Base
What it looks like
Water staining, damp patches, or active leaks on interior walls or ceilings near the top floor. Peeling paint, bubbling plaster, or mold growth near the roofline. On the roof side, ponding water at the parapet base or deteriorated roofing membrane.
Why it matters
Water infiltration causes interior damage, mold, structural deterioration of wood framing and steel lintels, and habitability issues for tenants. In co-ops and condos, it can trigger costly litigation. For a deeper look at prevention strategies, read the guide to preventing water infiltration.
What to do
Install or replace base flashing where the roof membrane meets the parapet wall. Lap the membrane up the parapet face a minimum of 8 inches. Repoint deteriorated mortar joints and address coping failures at the top.
7. Cornice and Ornamental Deterioration
What it looks like
Cracking, chipping, or missing pieces from decorative elements at or near the parapet level. This includes terra cotta cornices, stone brackets, carved details, and sheet metal cornices. Rust stains from metal cornice elements are also common.
Why it matters
Cornices and ornamental pieces are often heavy (hundreds of pounds for large sections), projecting out over the sidewalk, and attached with anchoring systems that may be 100+ years old. This is one of the reasons NYC enacted both FISP and LL126.
What to do
Probing and sounding during inspection can identify loose pieces. Repair options range from reattachment with stainless steel anchors to complete replacement with cast stone or fiber-reinforced polymer replicas.
8. Rust Jacking from Embedded Iron
What it looks like
Cracks following the location of embedded iron elements. Rust staining on the masonry surface. Brick or stone pieces pushed outward or displaced from the wall plane.
When iron corrodes, it expands to up to 7 times its original volume. The process is self-reinforcing: cracks allow more water in, which accelerates corrosion, which causes more expansion.
What to do
Remove affected masonry to expose the corroded iron. Treat with a rust converter and corrosion-inhibiting sealant, or preferably replace with stainless steel. Rebuild the masonry around the new or treated element. This is specialized work requiring a mason experienced with historic buildings.
9. Improper Previous Repairs
What it looks like
Patches of hard, gray Portland cement mortar in a wall of soft, tan or white lime mortar. Replacement bricks that are a different size, color, or density. Thick coatings of waterproof sealant or paint applied over the entire parapet surface.
Common mistakes that cause more damage:
- Portland cement mortar on soft lime mortar joints -- traps water, cracks brick
- Waterproof sealers that prevent the wall from breathing -- traps moisture inside
- Power tools for mortar removal on soft brick -- hand tools usually required
What to do
Carefully remove Portland cement mortar and replace with compatible lime-based mortar. Strip waterproof sealers chemically. These corrections should be done by a mason who specializes in historic masonry restoration.
10. Vegetation Growth
What it looks like
Plants, moss, or vines growing from mortar joints, coping joints, or cracks in the parapet. In NYC, ailanthus (tree of heaven) is aggressive enough to root in a half-inch mortar joint.
Why it matters
Small plants may seem insignificant, but their root systems can cause disproportionate damage. A small ailanthus sapling can generate enough force to displace bricks within a single growing season.
What to do
Remove all vegetation immediately. Cut plants at the base and treat roots with a non-toxic herbicide. Do not pull plants out, as this can dislodge loose bricks. After removal, repoint affected mortar joints and fill cracks.
How Age and Building Type Affect Risk
Not all pre-war buildings face the same parapet problems at the same rate. Here is how age, construction type, and location affect what you should be watching for:
1880s to 1900: The Oldest Stock
Load-bearing masonry with very soft brick and pure lime mortar. Parapets have survived 120+ years. Mortar likely eroded beyond its functional limit. Rust jacking from embedded iron is common. Often have elaborate cornices and decorative elements in terra cotta, brownstone, or pressed metal.
1900 to 1920: Transition Era
Transition from lime mortar to lime-Portland cement blends, and from load-bearing masonry to steel-frame with masonry cladding. Some developers used higher-quality face brick on the street side and cheaper common brick on the sides and rear. Side and rear parapets often deteriorate faster.
1920 to 1940: Late Pre-War
Portland cement increasingly common. Art Deco design with different parapet profiles. May have concrete coping instead of stone, simpler designs. Mortar generally harder but can be too hard for the brick, causing spalling. Often requires mortar analysis before repair.
Location-Specific Factors
Exposure Direction
South and west-facing parapets get the most sun and wind-driven rain, causing more thermal cycling damage. North-facing parapets stay damp longer, promoting biological growth.
Proximity to Infrastructure
Buildings near bridges, elevated railways, or heavy truck routes experience vibration that loosens mortar and dislodges loose elements over time.
Street Width
Narrow streets keep parapets perpetually shaded and damp. Wide avenues provide more sun but also more thermal stress and wind exposure.
Borough Patterns
Manhattan and Brooklyn brownstone neighborhoods have high concentrations of parapets well into their second century. Queens and the Bronx have significant pre-war stock that is often under-inspected.
What to Look for Between Professional Inspections
Annual professional inspections under Local Law 126 are a requirement. But problems can develop between inspections. Here are the warning signs to watch for (and you can find more detail in the article on signs your building may need immediate parapet repairs):
From the Street
- Visible cracks in the parapet wall or mortar joints
- Pieces of brick, stone, or mortar on the sidewalk below
- White efflorescence staining on the parapet face
- Coping stones that appear shifted or misaligned
- Vegetation growing from joints or cracks
- Rust stains running down the facade
From the Roof
- Loose or rocking coping stones
- Mortar joints you can scrape out with a key
- Bricks that are cracked, spalling, or dislodged
- Water pooling at the base of the parapet
- Gaps between the parapet wall and the roof membrane
- Active leaks on the interior side
From the Interior (Top Floor)
- Water stains on walls or ceilings near the roofline
- Peeling paint or bubbling plaster near exterior walls
- Damp or musty smell near the building perimeter
- Visible mold growth near where walls meet the ceiling
The Cost of Neglect in Pre-War Buildings
Pre-war parapet problems do not stay small. They compound. A mortar joint that costs $500 to repoint today becomes a section of spalled bricks costing $5,000 next year, which becomes a leaning parapet requiring $25,000 in reconstruction two years later. For specific cost ranges by repair type, see the parapet inspection cost guide.
Routine inspection flags as SWARMP. Repointing costs $15-$30/sq ft.
$1,500 - $3,000
Repointing plus brick replacement at $30-$75 per brick.
$5,000 - $10,000
Unsafe classification. Sidewalk shed required ($15K-$40K+), plus coping and masonry repairs.
$30,000 - $60,000+
Partial or full reconstruction: dismantling, rebuilding plumb, structural ties, new copings and flashing.
$40,000 - $100,000+
Working with Contractors on Pre-War Parapet Repairs
Not every masonry contractor is qualified to work on pre-war buildings. The materials and techniques are different from modern construction, and using the wrong approach causes more harm than good.
What to Look For
- Demonstrated experience with pre-war NYC masonry
- Knowledge of lime mortar and its proper application
- Access to salvaged or matching brick
- Familiarity with terra cotta repair and replacement
- Willingness to do a mortar analysis before repointing
- Proper insurance, licensing, and DOB permits
Red Flags
- Proposes Portland cement mortar for soft lime mortar joints
- Suggests waterproof coating the entire parapet
- Cannot provide examples of previous pre-war masonry work
- Wants to use power tools (grinders) for mortar removal on soft brick
Your inspection company can often recommend qualified masonry contractors. See the guide to choosing a parapet inspection company for what to look for in an inspection partner.
Frequently Asked Questions
How do I know if my building is considered pre-war?
In NYC real estate, "pre-war" generally refers to buildings constructed before 1940. You can find your building's approximate construction date on the DOB BIS (Building Information System) website by searching your address.
Are pre-war buildings more likely to fail a parapet inspection?
Pre-war buildings are more likely to receive SWARMP classifications due to the natural deterioration of aged mortar and masonry. Whether this progresses to Unsafe depends on how well the building has been maintained. A pre-war building with consistent upkeep can receive Safe classifications for decades.
My building was repointed 10 years ago but the mortar is already failing. Why?
If Portland cement mortar was used on a soft-brick pre-war building, the mortar itself may be intact but the brick around it is likely spalling. This is a sign of incompatible repointing. The remedy is to remove the cement mortar carefully and repoint with a compatible lime-based mix.
Should I apply a waterproof sealer to my pre-war parapet?
In most cases, no. Pre-war masonry needs to breathe. Waterproof sealers trap moisture inside the wall, causing more freeze-thaw damage than they prevent. The correct approach is to maintain coping joints, flashing, and mortar joints in good condition.
Is it possible to add flashing to a pre-war parapet that was built without it?
Yes, but it requires partial disassembly: removing copings and top courses of brick, installing a through-wall flashing membrane, and rebuilding on top. This is a significant project but provides a permanent solution.
Does Local Law 126 treat pre-war buildings differently from newer buildings?
The law does not distinguish between pre-war and post-war construction. All buildings with parapets along public right-of-way are subject to the same annual inspection requirements. However, inspectors experienced with pre-war construction will provide more useful recommendations.
My pre-war building also needs a FISP inspection. Can one inspection cover both?
In your FISP cycle year, a FISP inspection can satisfy LL126 requirements if the FISP report specifically addresses the parapet. In non-FISP years, a separate LL126 inspection is required.
Protecting Your Pre-War Building
Pre-war buildings are irreplaceable. The craftsmanship, the materials, and the construction techniques used in these buildings cannot be replicated at any reasonable cost today. Protecting their parapets is not just a compliance exercise. It is preservation of a building that has already stood for nearly a century and, with proper care, will stand for another.
The common thread through every problem on this list is water. Water enters through failed mortar joints, damaged copings, and missing flashing. It freezes, expands, and degrades the masonry from within. Every maintenance dollar you spend keeping water out of your parapet is a dollar well invested.
Start with a thorough annual inspection by someone who understands pre-war construction. Follow through on the repair recommendations. Keep your records organized. And do not ignore SWARMP findings: they are early warnings that give you time to act before conditions become urgent and expensive.
Pre-War Building Parapet Inspections
VetraCheck inspects parapets on pre-war buildings across all five NYC boroughs. Our licensed engineers understand the unique materials and construction methods in older buildings and provide detailed, actionable reports. Schedule your inspection today.